


Happy Birthday!

I was kind enough to remove an essential tidbit of information from the above photos.
 I have been wanting to make dutch babies or apple pancakes for a really long time. I have found tons of recipes, but they all say to make them in a 9" or 10" cast iron skillet. When I found this recipe in the latest Penzey's spice catalog I knew I had to try it. This was so easy and quick for a Saturday morning breakfast. I thought it was really good and didn't even put syrup or butter on it.
  Pour 1/2 the egg mixture over the apple slices in each pan. Sprinkle the remaining CINNAMON SUGAR over the batter in each pan. Bake until puffed and golden brown, 20-25 minutes. Serve right away, while still puffy, with warm syrup.
 Ok, so I'll confess...I used the full fat Boursin Cheese in this recipe. I feel guilty, this is supposed to be Cooking Light, but my grocery store does not sell "light" Boursin Cheese. I suppose I really missed the point here, but I did not miss the flavor. This was a really tasty and simple meal to put together. Another one to add to the "regular" menu (whatever that is). David wants to know what was wrong with the first hundred things we ate and posted on the blog. Why can't we have any of those things again? What fun would that be?
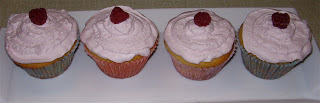
 I believe it was the February issue of Mary Jane's Farm Magazine that was all about bees and honey. One of the things they recommended to help save the honey bees was to buy more had been wanting to purchase the Raspberry Honey from Moon Valley for a long time and this gave me the perfect excuse. Save the bees, eat more cupcakes! I think I should make some bumperstickers. These were really good, but did not hold up to the second day. Eat them immediately after frosting.
 Meyer Lemon and Raspberry Cupcakes
 Add eggs, one at a time. Add half of the reserved dry ingredients to the butter mixture; mix on low until just combined. With mixer running on low, slowly add the lemon mixture. Add remaining dry ingredients until combined. Gently fold in raspberries. Fill paper-lined muffin tins 2/3 full.
  Bake 18-22 minutes, or until a toothpick inserted in center of a muffin comes out clean. Remove to wire rack; cool. Frost with Honey Raspberry Whipped Cream (below) if desired.

 I think with the return of the sunshine and slightly warmer temperature my body has been fooled into thinking it is May. I had a serious craving for Farmer's Market Falafel. There is not much I can do about it since opening day of the market is still another two months away. Ugh! In the meantime I decided to make my own at home. I had thought I was going to try and make pita bread as well and lost my motivation at the last minute and just went the store bought route. These were some huge falafel, almost like veggie patties. I did find the mixture to be extremely wet and added about a 1/4 cup of chickpea flour at the end. These were just as good as the Farmer's Market, if only I had all the pickles and yummy toppings to go with them. I'm counting the days...
 This month the Cake Slice Bakers chose this Lemon Chiffon Cake. I substituted Meyer Lemons. Are you surprised? This was a really delicious cake and would be just as good with regular lemons. It was a great way to celebrate spring, although I must say it felt a lot more like spring two weeks ago when we ate this cake than it does today, the first day of spring.


 Are you still looking for a quick St. Patrick's Day dinner? Well, unless you are in Alaska you probably already had dinner. Just in case...we had this ale stew a couple of weeks ago and I think it would make the perfect St. Patrick's Day meal. There is a lot of ale in this stew and a little touch of green in the dumplings. I had never thought of dumplings in beef stew, but they are really good. Who can't use another excuse to have dumplings?

 I couldn't figure out what was going on outside on Saturday. Brody almost never barks, even when we ask him to "speak" he just lets out a wimpy little squeak. When he does let out a full bark his Great Pyrenees comes out and the whole house shakes. Brody was outside with David and there was a lot of barking going on. Something exciting must have been happening. When I looked out the window I witnessed Brody retrieving a chunk of ice that must have been nearly as big as he was.
  I have never really been a fan of Sweet and Sour anything. The Sweet and Sour Chicken found in most Asian restaurants drowing in its thick red sauce with deep-fried chicken is just a bit too much. Now don't get me wrong I have nothing against deep-fried chicken. I think it is the sauce that always got to me. Once I tried to make it with the jar sauce from the grocery store and that made matters even worse. This recipe however was a very nice only mildly red sauce that was quite light and complemented the dish very well. The ginger added a nice fresh flavor and I really enjoyed the extra kick the chili paste gave the dish. I would make this again and would like to try it with pork as well.
  Yes, my friends I am cleaning out my draft folder this week. How did you know? Was it the horrible greenish-yellow light of winter that gave it away? I have about a dozen posts with only recipes and pictures sitting in my draft folder just waiting to greet you. I promise that they are all very good recipes and worthy of your kitchen. We just had a bumpy winter and although we didn't quit eating, I just couldn't keep up with the blog posting.
 Season slaw to taste with salt and pepper.
 Fold tacos in half. Cook until golden brown, about 1 minute per side. Fill tacos with feta and slaw. Pass hot sauce alongside.
 The problem with setting up advance posting on my blog is that sometimes I forget to go back and add the comments before an item posts. Like today....
 Scottish Cream Scones
 Cut circle into 8 wedges.
 I have really enjoyed the February Issue of Fine Cooking Magazine. I try to curb my magazine addiction by telling myself I can not buy a magazine unless I can find at least four recipes I would like to cook in the index section. Too many times I have purchased a cooking magazine just for its pretty cover only to find there really isn't anything in it I want to cook. I am also being more cautious as most magazines print all their recipes online now. As of late Fine Cooking had not been posting most of their recipes online, so when I browsed through this issue and immediately saw several recipes I would like to try including three with pork (I am pork challenged) I decided to go for it. These pork chops were really good. I have been trying to find a really good and simple recipe for jerk seasoning. I love the fresh flavor these pork chops had. I would use this same recipe with chicken as well. I bet it would be great. This will probably being our first choice when looking for jerk seasoning in the future.
 It is not often that I make a full Indian meal for just the two of us anymore. When this arrived from Rebecca last week I knew it was time for a complete Indian dinner to appear in our kitchen:
 Heat about 1 inch of oil on medium high heat in a heavy bottom saucepot. Using a large spoon or tablespoon size cookie scoop drop several dollops of the paste into the hot oil and deep-fry, turning once until golden brown. Frying too many pakoras at one time will reduce the temperature of the oil and the pakoras will fall apart and soak up too much oil. Fry in small batches. Remove pakoras from oil and set on tray or platter lined with paper towel. Repeat until the entire mixture is finished.


