In Season

Spicy Sweet Onion Dip

Showing posts with label new cookbook challenge. Show all posts

Sunday, December 14, 2008

Princess Marshmallows


So why are these princess marshmallows? I thought you would never ask. Well, they have princess emulsion instead of vanilla extract. Where does one find princess emulsion? King Arthur, of course!

Since moving to Alaska I seem to order a lot of items online. I was in the market for some espresso powder and gelatin sheets. I needed gelatin sheets to make marshmallows, something I have always wanted to try. We always get scammed on shipping here in Alaska. It always drives me crazy when I pay an extra $10 for shipping and then the items come in a flat rate priority mail box! So when I went to check out I was told I could order an extra $7 worth of stuff and not pay any more in shipping, it sounded appealing. Under this little notice they had listed some items I could get for under $7 and one of them happened to be Princess Bakery Emulsion. The description sounded interested and being a sucker for a good deal I added it to my cart. What would I do with Princess emulsion?
As I was digging around in my cupboards looking for the gelatin sheets I came across the princess extract and just the thought of Princess Marshmallows sounded fun. I couldn't resist. So, here they are. The recipe comes from Baked: New Frontiers in Baking. I highly recommend this cookbook, it really is amazing. These marshmallows are really good and I can't ever imagine buying store bought again. I see they have chocolate ones on their website, chocolate marshmallows in hot chocolate, can you imagine?
I'm sure they would be just as good with vanilla. If you ever come across princess extract it has a lovely spice/citrus flavor that kind of tastes like marshmallows!

Friday, October 24, 2008

Chipotle Cheddar Biscuits

One thing to be said for the Baked: New Frontiers in Baking cookbook is that they don't do anything halfway. I'm also realizing that these guys love their salt. Hence, the Sweet and Salty cake is one of the recipes in the cookbook. Every recipe I have made so far could have had the salt cut in half. These are some seriously cheesy biscuits. We will be making these again, soon! I'm just wondering how they would turn out if the cheese was reduced. Let me know if you try.

Chipotle Cheddar Biscuits

2 1/2 cups all purpose flour
1 teaspoon freshly ground black pepper
1 tablespoon chipotle powder
1 tablespoon sugar
1 tablespoon baking powder
1 teaspoon cream of tartar
1 teaspoon salt
1/2 cup (1 stick) unsalted butter, chilled and cut into 1 inch pieces
2 cups grated and tightly packed sharp cheddar cheese
1 1/4 cups buttermilk
1 large egg
Kosher salt for topping

Preheat the oven to 400 degrees F. Line a baking sheet with parchment paper. 
In a large bowl, whisk the flour, pepper, chipotle powder, sugar, baking powder, cream of tartar, and the 1 teaspoon of salt. 
Add the butter, and using your hands or the back of a wooden spoon, work the butter into the dough. The mixture should look like coarse sand. Add the cheese and stir to thoroughly incorporate into the dough.
In a small bowl, whisk together the buttermilk and egg. Add to the flour mixture and stir until just incorporated. Do not overmix.
Use a small ice cream scoop or a 1/4 measuring cup to scoop the dough and drop it in mounds onto the prepared baking sheet about 2 inches apart. Sprinkle with kosher salt and bake in the center of the oven for about 20 minutes, rotating the baking sheet halfway through the baking time, until golden brown and a toothpick inserted in the center of a biscuit comes out clean.
Transfer the biscuits to a cooling rack. The biscuits can be served slightly warm or at room temperature (we like them slightly warm).
Store the biscuits in an airtight container for up to 2 days.

Thursday, October 16, 2008

White Chicken Chili


It felt a little strange pulling out the Ski House Cookbook in October, but we have had snow for weeks, so I figured it was acceptable. Not to mention David has already been skiing a few times. I hear the conditions are pretty good at Birch Hill. Anyway, I was running some errands on the far end of town yesterday and picked up a loaf of jalapeno cheddar cornbread from LuLu’s Bakery. I still have not got around to getting my own sourdough starter going, so we are still stuck with quick breads if I make bread at home. I wanted something to compliment the bread and thought a white chili would be perfect. I made a “quicker” version as the original calls for dried beans.

White Chicken Chili
adapted from The Ski House Cookbook
2 cans of Great Northern or Cannellini beans, rinsed
1 tablespoon extra virgin olive oil
4 cloves garlic, minced
1 large yellow onion, diced
1 can chopped green chilies
1 tablespoon ground cumin
½ teaspoon cayenne
½ teaspoon salt
¼ teaspoon freshly ground black pepper
¼ teaspoon red pepper flakes
4 cups chicken broth
1 lb. boneless, skinless chicken breast halves
1 tablespoon cornstarch
¼ cup heavy cream
optional: cheddar cheese, cilantro, fresh onions, tortilla chips for topping

Heat the oil in a large pot over medium heat. Add the garlic, onion, and chilies and cook until softened, about 5 minutes. Add the cumin, cayenne, salt, pepper, and red pepper flakes and cook for 1 minute more. Stir in the broth and bring to a boil. Lower the heat so the broth simmers and add the chicken. Cook until the chicken is cooked through, about 20 minutes. Remove the chicken from the pot and transfer to a cutting board. Add beans to the pot and let simmer. Remove ½ cup broth from pot and mix well with cornstarch. Add cornstarch mixture and cream to pot and mix well. Using two forks, shred the chicken, and then return it to the pot. Let simmer another 5 minutes and serve topped with cheese.

Wednesday, October 15, 2008

Potato Skillet Pie


First of all, it is a great time of year to be in Fairbanks. There is just enough snow for skiing and there is still a little daylight. This week the moon has been absolutely beautiful. Winter has definately set in. The temperature this morning at work was -5 degrees fahrenheit. Brrrr....
In many ways it really feels good to just sit and relax by the woodstove after dinner. The crazy days of summer are over. Preparing for winter can sometimes be harder than the actual winter. Now that we have our wood in the shed and the greenhouse and yard cleaned up, we can spend our evening reading and relaxing.
A few weeks ago our neighbors invited us over to get what was left of the potatoes in their garden. They "only" had two rows of reds left is what they told us, but we were welcome to take what was left. So we ended up with a wheelbarrow full of the most beautiful red potatoes I have ever seen. We estimate there to be somewhere between 70-90 pounds of potatos. Our dog weighs 70 lbs and there appears to be more potatoes than dog here.... So, I figure we will need to eat an average of 3lbs. of potatoes a week between now and June. Each week I am going to try and make one recipe that is primarily potatoes.
When I posted my "New Cookbook Challenge" Alison from Alison's Lunch wrote to say the Vegetarian Suppers from Deborah Madison's Kitchen was one of her favorite cookbooks. Last night I decided to make Potato Skillet Pie. There are many adaptations to this recipe in the cookbook and I would highly recommend them as this would have been pretty plain without some spicing up. I added cheddar cheese and topped the pie with Honey Chipotle Sauce. This recipe calls for Yukon Gold or other yellow potatoes, so I did not tap into my 90 lbs of red potatoes yet. I still had some beautiful yellow potatoes from the Farmer's Market. Also, this is recipe #8 in my new cookbook challenge. Stay tuned and help me choose my next cookbook purchase and maybe win one for yourself as well!
Potato Skillet Pie
from Vegetarian Suppers from Deborah Madison's Kitchen

4 tablespoons of butter or oil
1 cup breadcrumbs or 1/2 cup grated parmesean cheese (I used a little of both)
2 lbs of Yukon Gold, or Yellow Finn Potatoes peeled and cut into chunks
sea salt and freshly ground pepper
2 garlic cloves
4 eggs lightly beaten with a little water
3 tablespoons of chopped fresh sage

Preheat the oven to 375 degrees Fahrenheit. Put a 10 inch cast iron skillet ( I used a small glass baking dish as I do not own a cast iron skillet) in the oven with a tablespoon of butter until melted. Brush it around, then scatter bread crumbs or parmesan cheese to make a crust for the potatoes. Put the potatoes in a saucepan and cover with cold water. Add a teaspoon of salt, bring them to a boil, then simmer until the potatoes are soft, about 20 minutes. While they’re cooking, smash the garlic in a mortar with ½ teaspoon of salt until smooth. Drain the potatoes and return them to the pot. Add the garlic and remaining butter and mash. Taste for salt and pepper, making sure the potatoes are highly seasoned. Then stir in the eggs and sage, transfer the mass to the skillet, and smooth the top. Bake until golden and pulling away from the sides of the pan, about 45 minutes. Remove and let stand for 10 minutes, then run a knife around the edge and unmold onto a serving plate.

Tuesday, October 14, 2008

Baked Brownies

Wow! Get your glass of milk ready. These are some of the richest, most fudge like brownies I have ever eaten.

The Baked Brownie
from Baked New Frontiers in Baking
1 1/4 cups all-purpose flour
1 teaspoon salt2 tablespoons dark unsweetened cocoa powder
11 ounces dark chocolate (60 to 72% cacao), coarsely chopped
1 cup (2 sticks) unsalted butter, cut into 1-inch pieces
1 teaspoon instant espresso powder
1 1/2 cups granulated sugar
1/2 cup firmly packed light brown sugar
5 large eggs, at room temperature
2 teaspoons pure vanilla extract

Preheat the oven to 350 degrees F. Butter the sides and bottom of a 9 x 13 glass or light-colored metal baking pan.
In a medium bowl, whisk the flour, salt, and cocoa powder together.
Put the chocolate, butter, and instant espresso powder in a large bowl and set it over a saucepan of simmering water, stirring occasionally, until the chocolate and butter are completely melted and smooth. Turn off the heat, but keep the bowl over the water and add the sugars. Whisk until completely combined, then remove the bowl from the pan. The mixture should be room temperature.
Add 3 eggs to the chocolate mixture and whisk until combined. Add the remaining eggs and whisk until combined. Add the vanilla and stir until combined. Do not overbeat the batter at this stage or your brownies will be cakey.
Sprinkle the flour mixture over the chocolate mixture. Using a spatula (not a whisk), fold the flour mixture into the chocolate until just a bit of the flour mixture is visible.
Pour the batter into the prepared pan and smooth the top. Bake in the center of the oven for 30 minutes, rotating the pan halfway through the baking time, until a toothpick inserted into the center of the brownies comes out with a few moist crumbs sticking to it. Let the brownies cool completely, then cut them into squares and serve.
Tightly covered with plastic wrap, the brownies keep at room temperature for up to 3 days.

Sunday, October 12, 2008

Soy Sausage


I have no idea what took me so long to make these sausages. This recipe has been on my list to try for nearly two years. As with a lot of the recipes in the Cafe Flora Cookbook it is a bit time consuming, but worth it in the end. These were really good and dare I say tasted like real sausage.
Café Flora Vegan Soy Sausage
from Café Flora Cookbook
5 ounces (about 1 1/2 cups) TVP (unflavored textured vegetable protien)
1 1/4 cups very hot water
2 tablespoons Egg Replacer or other egg substitute equal to 2 eggs
1/2 cup cold water
1/2 block extra firm tofu pressed or extrafirm tofu
2 tablespoons chopped garlic
1 tablespoon fresh rosemary
1 1/2 teaspoons dried thyme
1 1/2 teaspoons dried sage
2 teaspoon fennel seeds toasted and coarsely ground
1 teaspoon red pepper flakes
2 teaspoons salt
1 teaspoon freshly ground black pepper
2 tablespoons corn starch
Vegetable oil for frying
Prepare the TVP. In a large bowl, cover the TVP with the hot water, stir once, and then cover the bowl with plastic wrap and let steam for 15 minutes. Remove the plastic wrap, put the TVP in a mesh strainer over a bowl to drain.
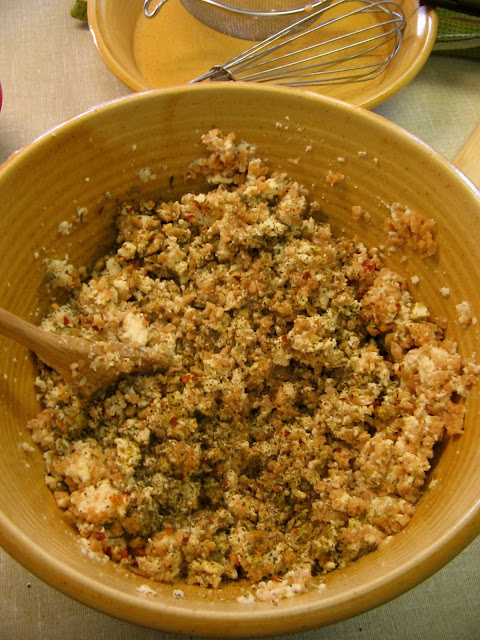
Make the sausage mixture. In a medium bowl, whisk the egg replacer with the cold water until it is slightly foamy like whipped egg white. Pat the tofu dry, and crumble into the egg replacer. Mix with your hands until thoroughly combined. Add the TVP along with all the remaining ingredients except oil, and mix well.Shape the patties. Using 3 tablespoons of the TVP mixture for each patty, shape it into balls. Gently flatten each ball with your fingertips into a patty about 2 1/2 inches in diameter. Smooth out the jagged edges so they don't break off when you cook them. Lay the patties on an ungreased cookie sheet until you are ready to fry them.Fry the sausage. Heat about 1/4 inch of oil in a nonstick skillet over medium-high heat. (If you don't have a nonstick pan, any heavy skillet works well.) When it's hot, put several patties in the pan, leaving enough room to flip them easily. Cook on each side until browned and heated through, about 2 minutes per side. Drain the patties on paper towels. Keep them warm in a 200 degree oven until ready to serve (no longer than half and hour).

Thursday, October 9, 2008

Yam and Pepita Quesadilla

Sorry for the inconvenience, but this post has been updated with new photos.  You can find the updated version here.

Wednesday, October 8, 2008

Blueberry Almond Scones (the quest for the perfect scone part 2)


As I warned you last week, I am on a quest for the perfect scone. This is not it! I replaced the cherries with dried blueberries and cut them into triangles rather than circles. Other than that, not too many changes. These were not bad, just not what I was looking for in texture or flavor. David and everyone at work seemed to like them. I will keep trying. Here is the original recipe...
Cherry Almond Scones
from Macrina Bakery and Cafe Cookbook
1/2 cup dried cherries
1/2 cup whole almonds
3 cups unbleached all-purpose flour
1/2 cup granulated sugar
2 teaspoons baking powder
1 teaspoon baking soda
12 tablespoons (1 1/2 sticks) unsalted butter, chilled
1 egg
1/4 cup buttermilk
1 teaspoon pure vanilla extract
1/4 teaspoon pure almond extract
Egg wash made with 1 egg and 1 tsp water
1/4 cup coarse raw sugar
Preheat oven to 350 degrees.Place dried cherries in a small bowl and cover with warm water. Let soak for 10 minutes. Drain the plumped cherries, coarsely chop and set aside.Place almonds on a rimmed baking sheet and toast for appromimately 15 minutes or until golden brown. Let cool, then coarsely chop and set aside.Line a rimmed baking sheet with parchment paper.Sift flour, granulated sugar, baking powder, and baking soda into a medium bowl and toss with your hands to combine.Divide chilled butter into 1/4 inch pieces and drop into bowl of dry ingredients. Using a pastry cutter or fork, cut butter into mixture until texture is coarse and crumbly. Add the chopped cherries and almonds and mix with a wooden spoon. Combine egg, buttermilk, vanilla extract, and almond extract in a small bowl and mixt with a whisk. Add to dry ingredients and mix gently with a wooden spoon just until dough comes together. Take care not to overmix the dough. Coat your hands with flour and pull dough from bowl onto a floured surface. Knead the dough for a few minutes, folding and flattening it several times, until dough becomes moldable. Dust the work surface with a little more flour and roll dough out to 1 inch thick. Using a round biscuit cutter (about 3 inches), cut 8-10 scones from the dough. Place scones on the prepared baking sheet, bursh with egg wash, and sprinkle coarse raw sugar over the tops. Bake on center rack of oven for 20-25 minutes, or until golden brown. Let scones cool on baking sheet for 10 minutes before serving.

Tuesday, October 7, 2008

Easy Homemade Granola

Why mess with a good thing? I always use this as an excuse not to try something new. We have been eating the same granola for over a year. We really like it, so why change? Well, because you might just find a really fabulous new granola. I have to say that I made a lot of changes to this recipe, so if you want the original baked recipe I would buy the cookbook. We don’t really like dried fruit in our granola, so I didn’t add any. The core honey mixture is really great. I was afraid it would be really sweet, but in the end I thought it had a really nice flavor. The texture is exactly what I like in a granola, little chunks that are just slightly chewy. I will probably make a few changes next time, maybe add some coconut and wheat germ to the mix. If you want to add some raisins the original recipe says to add them after the mixture has cooled completely. Here’s to trying something new…

Easy Homemade Granola
adapted from Baked New Frontiers in Baking
4 cups rolled oats
2 teaspoons cinnamon
½ teaspoon salt
1/3 cup vegetable oil
½ cup honey
½ cup firmly packed light brown sugar
2 teaspoons vanilla extract
½ cup almonds slivered
½ cup hazelnuts coarsely chopped

Preheat oven to 325 degrees F. Line baking pan with parchment paper.
In a large bowl, toss the oats with the cinnamon and salt.In a medium bowl, stir together the oil, honey, brown sugar, and vanilla.
Whisk until completely combined.
Pour the honey mixture over the oats mixture and use your hands or stand mixer with paddle attachment on lowest speed to combine them. Mix until all the oats are covered with the honey mixture.
Pour mixture into the baking pan. Spread it out evenly, leaving a few clumps here and there for texture. Bake for 10 minutes, then remove from the oven and us a metal spatula to lift and turn the granola. Sprinkle the almonds over the granola and return to the oven.
Bake for 5 minutes, then remove from the oven and turn the granola again. Sprinkle hazelnuts over the granola and return to oven.
Bake for 10 minutes then remove from oven. Let cool completely. Transfer to an airtight container. Granola will keep for 1 week.

Sunday, October 5, 2008

Naan

I love cooking Indian food at home. The way the house smells as each new spice is added makes the whole place feel warm and cozy. Then there is that smell when you first lift the lid on the pot of basmati rice, and add the smell of warm Naan cooking in the oven…
When David and I first moved to Fairbanks he traveled to Anchorage quite often for work. Every time he left I would give him a little shopping list of hard to find food items to take back in his suitcase. Naan was always on that list. We eat tofu tikka masala nearly once a week during the winter months. I always say I will make some other curries, but rarely ever do. It is just too easy to stick with what you know and like. In an effort to branch out and cook some different curries, I purchased the cookbook 660 curries last winter. I haven't tried any of the curry recipes in the book, but it was worth the money just for the Naan recipe. It is simple in that it doesn't call for any special flour or spices. I can find all the ingredients for this Naan right here in Fairbanks. The best part is that I can now fill my freezer with raspberries and cranberries instead of Naan bread.
This dough is incredibly sticky. The first few times I made it I was really frustrated, but eventually learned that I could use a little less water and it still turned out well. I try to use as close to a cup as possible, but if it is unmanageable I add a little more flour back in. Make sure you flour all your utensils including the knife you use to cut the dough.

Salt Crusted Flat Bread
Adapted from 660 Curries

3 cups unbleached all-purpose flour, plus extra for dusting
2 teaspoons baking powder
1 teaspoon coarse kosher or sea salt, plus extra for sprinkling
½ cup buttermilk at room temperature
About 1 cup warm water
Canola oil
Ghee or melted butter for brushing

Thoroughly combine the flour, baking powder and salt in a large bowl. Pour the buttermilk over the flour mixture and quickly stir in. Add a few tablespoons of warm water to the mixture, stirring as you go. Repeat until the flour comes together and forms a soft ball. You want the dough to be very soft and slightly sticky. Gather the ball and any dry flour at the bottom of the bowl, knead for about 2 minutes to form a soft smooth ball. Dust your hands with flour to avoid sticking, but avoid adding flour to the dough.
Cut the dough into four equal portions. Lightly grease a plate with oil. Shape portions into a round resembling a hamburger bun, and place on greased plate. Brush the tops with ghee and cover with plastic wrap. Let sit at room temperature for about 30 minutes.
Place pizza stone in bottom rack of oven and turn oven to highest setting. Most conventional ovens heat to 550 degrees. Tear off 5 sheets of wax paper about 8 inches wide and set aside.
Lightly flour a workspace and set one round of dough on it. Press down to form a patty and roll dough into a circle 5-7 inches in diameter, dusting with flour as needed. Sprinkle a little coarse ground salt on the surface and press in by gently rolling over surface. Lift the round and place on sheet of waxed paper (you can skip this step if you have someone to assist and place the dough directly into the oven) and cover it with the second sheet. Repeat with the remaining dough rounds, stacking them between wax paper as they are rolled.
Transfer rounds salt side down to the hot pizza stone. The dough will almost immediately start to bubble. Make this process quick and close the oven door as soon as possible. Bake until the bubbles on the dough acquire light brown patches. Remove from oven and brush the top with ghee. Continue with remaining rounds stacking them on top of one another until complete. Cut each round into six pieces and serve.

Saturday, October 4, 2008

Spicy Black Bean Burgers

These burgers had a really good flavor and I liked the texture. Although they were a little spicy, it wasn't more than I could handle. I really liked the way they turned out cooking them on the griddle as it made the outside nice and crisp. David thought they could use more rice and pumpkin seeds to make the texture a little more coarse. Next time, I will make them with sweet potato fries rather than the traditional oven fries. I probably will use regular lettuce instead of sprouts as a topping. In the future, some form of these burgers will eventually end up in our freezer for quick meals.

Spicy Black Bean Burgers
adapted from Rebar Modern Food Cookbook
1 can of black beans drained
1/2 cup cooked brown rice
1 1/2 tbsp. vegetable oil
1 small red onion
3 cloves of garlic minced
1/2 tsp. cumin
1/8 tsp. cayenne
1 tsp. salt
2 chipotles in adobo
1 can green chiles drained
1/4 cup masa harina
1/4 cup toasted pumpkin seeds finely ground
3/4 cup fresh bread crumbs

Heat oil in a skillet, add onion and saute until translucent. Add garlic and spices and continue sauteing and stirring for 5 minutes. Set aside to cool.
In the bowl of a food processor, add black beans, rice, chiles, chipotles and the cooled onion spice mixture. Pulse to coarsely grind the mix. Turn into a large bowl and add the masa harina, pumpkin seeds and breadcrumbs. Mix thoroughly and season with salt and pepper to taste.
Divide the mixture into 6 equal portions and form them into patties. Fry in a lightly oil pan or on a dry hot griddle until browned on both sides. Serve hot on a fresh bun or roll with your choice of toppings. Makes six.

Thursday, October 2, 2008

New Cookbook Challenge


October 2, 2008- I have always loved books. Anytime I become interested in a new activity I always feel the need to go out and purchase every book written on the subject. Cooking is no exception. Every time I buy a new cookbook I look at all the pictures and recipes and think about all the things I will make. The problem is that I have realized that although I love to buy new cookbooks, the novelty seems to wear off quickly as I move on to the next new cookbook. There are only a select few that I return to time and time again. So I have decided to make a resolution that I can only get one new cookbook for each ten recipes I make from the old ones. Seems fair. For some of you I know that would probably mean a new cookbook every 10 days. I highly doubt I will become that motivated.
On this page I will start making a list of five recipes from each of my new cookbooks that I would like to try. Eventually these recipes will becomes links to actual blog posts. I'm starting with the Baked Cookbook that just arrived yesterday. Below I will add links to recipe posts from my older cookbooks as I make them. Just to get things rolling I have added one link to a recipe I have already made and posted. I will not count it towards the 10!
Take a look at the "cookbooks in my kitchen" section on the main page of my blog. Do you own any of these cookbooks? Are there any recipes you would like to try? Any recipes you would recommend? Do you want to cook something together? If you already have posts with any of these recipes I would be happy to add a link. Drop me a comment and let me know. I am open to any ideas or suggestions.
Also, I will take a more thoughtful approach to the new cookbooks I actually do purchase. I will keep a list for potential new cookbooks. I would love to hear your comments on those as well.

1. Chipotle Cheddar Biscuits
2. Easy Homemade Granola
3. The Baked Brownie
4. Maple Walnut Scones
5. Vanilla Marshmallows


1. Anaheim Black Bean Burgers
2. Yam and Pepita Quesadilla


Related Posts with Thumbnails