In Season

Spicy Sweet Onion Dip

Friday, October 31, 2008

Monster Cookies

Happy Halloween! I thought I would bake up some Monster Cookies to celebrate. These cookies are really good, but I won't give you the recipe! What? Why, you ask? Well, I have already given you three recipes from the Baked: New Frontiers in Baking Cookbook. I felt it was ok to give you those ones as I found them posted on other places on the Internet. This is recipe #5 from this cookbook. I made the chocolate chip cookies and didn't post them because I turned them into a huge puddle. The cookies were way too big and all ran together. In any case, this cookbook has been a worthwhile investment, there are still several recipes I would like to try.
This was a fun post, both making the cookies and taking the photographs. I am curious... Why are there green and purple M&M's in the Halloween mix?

Wednesday, October 29, 2008

Soba Noodles with Broccoli, Walnuts, and Pomegranate

Last night I could not decide between these two recipes from Vegetarian Times:
Two Broccoli Stir-Fry on Soba Noodles
They both looked really good and used several items from our CSA. I am feeling CSA pressure right now because our next box is coming on Thursday and we still have quite a bit left from last week. I decided to combine the elements I liked from both recipes and see how it went. Surprisingly, my biggest complaint was that it really didn't have a lot of flavor. It was lacking any "real" sauce that would stick to the noodles. As much as I like Meyer Lemons, they may have been a little too mild for this recipe.

Soba Noodles with Broccoli, Walnuts, and Pomegranate
adapted from Vegetarian Times
1 8-oz. pkg. soba noodles
Juice of one meyer lemon
1/4 cup low-sodium soy sauce
1 Tbs. maple syrup
1/4 tsp. meyer lemon zest
2 Tbs. toasted walnut oil, divided
1 12-oz. pkg. extra-firm tofu, drained and cubed
2 cups broccoli florets
1 ½ cups red kale chopped
1 Tbs. minced fresh ginger
4 cloves garlic, minced (about 2 tsp.)
1/4 cup chopped walnuts, toasted
1 cup fresh pomegranate seeds
5 green onions, white and green parts chopped (about 1/3 cup)
Cook noodles in boiling salted water 3 minutes. Drain, rinse under cold water and set aside.
Stir together lemon juice, soy sauce, maple syrup and lemon zest in bowl. Set aside. Heat 1 Tbs. oil in skillet over medium heat. Add tofu cubes, and cook 10 minutes, or until browned, turning occasionally. Add garlic and ginger to skillet; stir-fry 30 seconds. Add broccoli and Kale; cover and fry 3 to 4 minutes, or until just tender. Remove cover, stir in soy sauce mixture; stir-fry 1 minute, or until mixture begins to thicken. Remove from heat. Top with walnuts and pomegranate seeds.

Tuesday, October 28, 2008

Roasted Acorn Squash and Garnet Yam Soup

This soup was pretty easy to make although roasting the yams and squash took 45 minutes . I added a very small amount 1/8 teaspoon or less of nutmeg. Would be a great weekend lunch treat.

Roasted Acorn Squash and Garnet Yam Soup
from Infraredherring
Serves 4 as an appetizer; 2 as a main dish

1 medium acorn squash, peeled, seeded, and cut into large cubes
2 medium garnet yams, peeled and cut into large cubes
1/2 teaspoon kosher salt
freshly ground black pepper
1/2 tablespoon olive oil
1 oz. slab bacon (or 2 slices bacon), finely diced
2 apples, peeled, cored, and diced
2 cups chicken stock
sour cream, to garnish

1. Toss the squash and yams with the salt, pepper, and olive oil. Roast at 450ºF for 45 minutes, or until tender.

2. While the vegetables are roasting, cook the bacon in a small skillet over medium-low heat until fat is rendered and bacon is crispy. Using a slotted spoon, scoop the bacon out and set aside. Turn up the heat to medium high, and add the apples. Toss to coat with the bacon fat, and cook, stirring frequently, until apples are browned.

3. Using an immersion blender (or in a regular blender), blend the roasted vegetables, half the crispy bacon, and chicken stock together until you have a smooth purée. Check the seasoning, and add salt and pepper if necessary. Serve hot, garnished with the caramelized apple, the remaining crisped bacon, and a dollop of sour cream. Enjoy!

Monday, October 27, 2008

So yeah, jam! -Jammin' Jelly Exchange


Molly over at Batter Splattered hosted her second annual Jammin' Jelly Exchange this year. This fun event has participants from around the world exchanging jam and jelly. I won't tell you what kind of jelly I sent off because I don't believe it has arrived at the final destinastion in Norway! My jelly arrived a little over a week ago from Rebecca who has a blog, but it is set to private. Only I will get to see what my jam looked like in London! I was so excited to get not one, but two jars of Jelly from Rebecca. The best part is that I had no idea what one of them was "Greengage and Gooseberry". I had no idea what a greengage might be, a fruit, a berry...
It turns out to be a type of plum. The jars arrived well packed and were absolutely beautiful! Who cares what the jelly tastes like, check out these jars...
Rebecca included a card with a nice note about why I ended up with two jars. She was a little nervous sending out the "cham" as she called it. This would be a cross between a chutney and a jam, I guess it set a little too solid. I still have yet to try it, but if it is anywhere near as tasty as the bramble and elderflower I will be in for a treat. Rebecca recommended the Greengage with cheese, so I will wait for a special occasion. Thanks so much to Rebecca for all the time she put in to making this treat and to Molly for hosting the Jammin' Jelly Exchange. I am in for next year!


Sunday, October 26, 2008

Golden Beet and Pomegranate Salad

When I was searching for recipes to make with my new CSA box, I knew this had to go on the list. I always try and challenge myself to make recipes that use more than one item from my CSA and this one used three (golden beets, pomegrante, salad mix), plus some local red onions I still had left from our summer CSA.

Golden Beet and Pomegranate Salad 
from Simply Recipes
3 golden beets (can use regular red beets if you want, just not as pretty)

1 cup diced red onion 

1/4 cup red wine vinegar

1/4 cup chicken broth or vegetable broth

3 tablespoons Triple Sec or other orange-flavored liqueur

1 tablespoon sugar

1/2 teaspoon grated orange peel

1 cup pomegranate seeds

Salt

2 cups arugula and butter lettuce leaves

1/4 cup crumbled feta cheese

 Cook the beets - either boil them for 45 minutes or roast them at 375°F for an hour. Let cool. Peel and dice into 1/2 inch cubes.
 In a 10 to 12-inch nonstick frying pan over high heat, boil beets, onion, vinegar, broth, liqueur, sugar, and orange peel, stirring often, until liquid is reduced to 2 tablespoons, 5 to 7 minutes. Let cool to room temperature, or chill airtight up to 1 day.
 Stir pomegranate seeds into the beet mixture and salt to taste. Serve on top of salad greens on individual plates. Sprinkle with feta cheese.
Serves 4.

Saturday, October 25, 2008

Suppa Club #2- Bavarian Sausage Hot Pot

You may have remembered from my potato soup post, that I have joined an online supper club sponsored by Molly over at Batter Splattered. This is our second meal "together". Corinne from Moonlit Knit was our host this month. We officially have a name now, the Suppa Club.  I am really late in posting my Suppa Club selection. This is a recipe that I never would have chosen on my own. One, it really didn't sound all that good in the beginning and two, there were some serious ingredient challenges. It seems to now be a pattern that the person whose turn it is to make the recipe selection selects two recipes and then we all vote on the final selection. I could see early on that the vote was leaning towards the Bavarian Sausage Hot Pot. I decided to get a jump on finding my ingredients and order some Caraway Seeds from Penzey's. Then I searched online for a sausage company that would ship Knackwurst or Kielbasa.  I kept holding out hope that I would find some sausage at Fred Meyer as I knew it was going to be a while for the sausage. Finally, this past Wednesday one lonely package of Knackwurst with my name on it showed up in the Fred Meyer meat section. It was from the Alaska Sausage Company. Whew! Now, all I needed was those green beans in my CSA on Thursday and I would be all set. The CSA arrives and guess what is missing? Yes, the green beans are missing from my CSA box. Last night after work I make one last attempt to find them at Fred Meyer, no fresh green beans. Do I leave them out or buy frozen? Ok, so I settled on frozen organic green beans. From here the Hot Pot was a breeze. I really didn't make any changes to the recipe. It was easy to throw together on a Friday night after work, even after a little walk with David and the dog. My only last challenge was getting a photo without David's fingers in it trying to steal the sausages...
This was a really easy, and really tasty meal. Cheers to Corinne and the Suppa Club.  Check out the rest of the Suppa Club Bavarian Sausage Hot Pots: Corinne (our host), Ingrid, Kirstin, Siri,and Molly.
Ingrid will be the host for our next meal. We are presently voting, but it looks like we are leaning towards the Pork Roast with Three Mushroom Ragout.
Bavarian Sausage Hot Pot
Epicurious | © 1993
By Jean Anderson and Hedy Würz
HarperCollins Publishers
Makes 6 servings.

1 pound cabbage, cored and sliced 1/2-inch thick
2 medium-sized carrots, peeled and sliced 1/4-inch thick
6 ounces green beans, tipped and snapped into 1-inch lengths
1 pound Maine or Eastern potatoes, peeled and cut into 1/2-inch cubes
2 cups shelled fresh green peas or frozen green peas (do
not thaw)
3 cups rich beef broth (preferably homemade)
1/2 teaspoon salt
1/8 teaspoon freshly ground black pepper
1/8 teaspoon freshly ground nutmeg
1 teaspoon caraway seeds
1 teaspoon dried leaf marjoram, crumbled
3/4 pound knockwurst or kielbasa, sliced 1/4-inch-thick
2 tablespoons coarsely chopped flat-leaf parsley

Place the cabbage, carrots, beans, potatoes, the fresh peas, if using, the broth, salt, pepper, and nutmeg in a large heavy kettle (pot). Set over moderate heat and bring to a boil. Adjust the heat so the broth bubbles gently, cover, and cook without stirring for 20 minutes. Add the caraway seeds, marjoram, knockwurst, and frozen peas, if using, and toss lightly to mix. Re-cover and simmer 10 minutes. Add the parsley, toss lightly, and serve in soup plates with crusty chunks of bread.

Friday, October 24, 2008

Chipotle Cheddar Biscuits

One thing to be said for the Baked: New Frontiers in Baking cookbook is that they don't do anything halfway. I'm also realizing that these guys love their salt. Hence, the Sweet and Salty cake is one of the recipes in the cookbook. Every recipe I have made so far could have had the salt cut in half. These are some seriously cheesy biscuits. We will be making these again, soon! I'm just wondering how they would turn out if the cheese was reduced. Let me know if you try.

Chipotle Cheddar Biscuits

2 1/2 cups all purpose flour
1 teaspoon freshly ground black pepper
1 tablespoon chipotle powder
1 tablespoon sugar
1 tablespoon baking powder
1 teaspoon cream of tartar
1 teaspoon salt
1/2 cup (1 stick) unsalted butter, chilled and cut into 1 inch pieces
2 cups grated and tightly packed sharp cheddar cheese
1 1/4 cups buttermilk
1 large egg
Kosher salt for topping

Preheat the oven to 400 degrees F. Line a baking sheet with parchment paper. 
In a large bowl, whisk the flour, pepper, chipotle powder, sugar, baking powder, cream of tartar, and the 1 teaspoon of salt. 
Add the butter, and using your hands or the back of a wooden spoon, work the butter into the dough. The mixture should look like coarse sand. Add the cheese and stir to thoroughly incorporate into the dough.
In a small bowl, whisk together the buttermilk and egg. Add to the flour mixture and stir until just incorporated. Do not overmix.
Use a small ice cream scoop or a 1/4 measuring cup to scoop the dough and drop it in mounds onto the prepared baking sheet about 2 inches apart. Sprinkle with kosher salt and bake in the center of the oven for about 20 minutes, rotating the baking sheet halfway through the baking time, until golden brown and a toothpick inserted in the center of a biscuit comes out clean.
Transfer the biscuits to a cooling rack. The biscuits can be served slightly warm or at room temperature (we like them slightly warm).
Store the biscuits in an airtight container for up to 2 days.

Wednesday, October 22, 2008

Meyer Lemon and Blueberry Scones

Another try for the perfect scones...
These are the first scones I have made that called for an egg. They are Orange-Current Scones in the Zuni Cafe Cookbook. No, I did not buy a new cookbook. I couldn't take it any longer and checked a few out from the library! I will call it research for my next purchase. I switched the Oranges and Currents for Meyer Lemon and Dried Blueberries. I prefer the Meyer Lemon Blueberry Scones from Bon Appetit that I have made many times. As with all the other scones these also seemed to disappear quickly.

Meyer Lemon and Dried Blueberry Scones
adapted from Zuni Cafe Cookbook

3 cups all-purpose flour
1/2 cup sugar
4 teaspoons baking powder
1/8 teaspoon salt
1/2 pound (2 sticks) cold unsalted butter
1/2 cup dried blueberries
1 tablespoon Meyer Lemon zest
1 large egg
1/2 cup whole milk

Preheat the oven to 350 degrees. Line two baking sheets with parchment paper. Combine flour, sugar, baking powder, and salt in a large bowl and mix well. Cut in the butter until it is the size of small peas. Add the blueberries and lemon zest and toss well.
Whisk together the eggs and milk. Add the dry ingredients and mix and fold until the dough masses and the flour is absorbed. Don't worry if the dough is a little streaky.
Divide the dough in half and shape into 2 balls. Pat each one into a 6 to 7 inch circle on a lightly floured surface. Roll about 1 inch thick and cut like a pie into 6 wedges each.
Bake until golden brown and firm to the touch, about 25 to 30 minutes. These are best served warm from the oven.

Tuesday, October 21, 2008

Meyer Lemons

I am a huge fan of Meyer Lemons. Every year I look forward to finding them in the grocery store. I pay the ridiculous price of $10 for a bag of six and usually find two of them rotten. David and I jokingly call the one's we buy here Fred Meyer lemons since that is where we end up purchasing them. In the last couple of weeks I have made a couple of great discoveries for fresh, organic produce. I will highlight a really exciting find in this Thursday’s post, but the first is local harvest. This site highlights places to purchase local produce, but they also have organic growers that ship at peak season. This is how I found The Lemon Ladies. They are producing Organic Meyer Lemons and apparently ship just about anywhere in the United States. They did say that this was the first time they shipped their lemons to Alaska. What I didn’t realize is that I ordered them on a government holiday week, which means our mail always gets backlogged. I was afraid that my poor lemons were going to be frozen solid by the time they arrived. The lemon ladies assured me that I could still turn them into marmalade if they did in fact freeze. When they didn’t arrive at work (I have everything shipped to my office) last Friday I thought for sure my lemon gamble would be a complete loss. I pictured my frozen lemons thawing and then refreezing as they took the ride with the mailman through Fairbanks on Saturday. Then Monday, still no lemons! Now, let me just say that this is in no part the fault of the lemon ladies. Our postal service can be challenging. Finally, yesterday morning the mailman backs up to the front door (this means there is a package in the back of the truck). Yes, the lemons arrived and I cautiously opened the box of 30 perfect lemons (7 lbs.). In addition, there was lovely little jar of Meyer Lemon Marmalade. I have been collecting recipes and information about Meyer Lemons for the last two weeks. Expect a lot of lemon posts this weekend…


Monday, October 20, 2008

Chipotle Pasta Part Two

I made Chipotle Pasta with Acorn Squash a few weeks ago and it was good, but not great. This dish has great potential to be really good, so I decided to give it another shot. The flavors really came together this time. It could still use a little tweaking, but much better than the first try. This is a simple weeknight meal.

Chipotle Pasta

1 large sweet potato cut into 1/2 inch chunks
2 boneless, skinless chicken breasts
1lb. box penne pasta
1 cup heavy cream
1/2 cup walnuts toasted and coarsely chopped
1 teaspoon chipotle powder

Preheat oven to 375 degrees. Place sweet potato and chicken in a large baking dish and place in oven for 30-40 minutes until chicken is cooked completely. Pour heavy cream into a medium size saucepan and simmer over medium heat for 15 mintues, whisk in chipotle powder. Cook pasta, drain, and return to pot. Cut chicken breasts into bite size pieces. Add cream mixture to pasta, stir in sweet potatoes, chicken, and walnuts. Serves four generous portions.

Sunday, October 19, 2008

Excellent Apple Pie- Miniaturized

When I told David I was going to make apple pie, he said he wanted his own pie. So, to answer his request, I made him nine of his own apple pies. Ok, I ate a couple of them. This apple pie comes from one of my favorite cookbooks that I don't actually own. I borrowed Northwest Essentials Cooking from the Port Townsend, Washington library. They had a really great cookbook section and I used to borrow cookbooks all the time. Before moving to Fairbanks, I spent an entire afternoon in the Port Townsend library copying all my favorite recipes. I love this book because along with great recipes it has some great stories as well. The author gives great explanations of what ingredients to use and why. Unfortunately, I couldn't find Cameo apples which are the variety I used in Washington and one of the varieties he recommends for this recipe. Sadly, this cookbook is  out of print. One of these days I will break down and order a used copy from Amazon.

Excellent Apple Pie
adapted from Greg Atkinson's Northwest Essentials Cooking

6 or 7 Newton Pippin, Golden Delicious, or Cameo Apples 
2 tablespoons fresh lemon juice
1 cup sugar
3 tablespoons cornstarch
1 teaspoon ground cinnamon
1/2 teaspoon freshly grated nutmeg

To prepare the filling, peel the apples, cut the sides away from the cores, and slice the fruit into very thin slices (for the miniature version, I cut the slices into smaller pieces). Toss the apples with the lemon juice in a mixing bowl, then stir n the sugar, cornstarch, cinnamon, and nutmeg and set aside. Preheat the oven to 350 degrees Fahrenheit. Prepare the pie crust. For miniature pies cut dough with a 3 inch round cookie cutter. Place one tablespoon of filling on one round.
Cover with a second round and crimp the edges. Place pies on ungreased cookie sheet.
Bake for 25 minutes or until crust is well browned and pies are bubbling.

Saturday, October 18, 2008

Alaska Day

This post has nothing to do with food! Two years ago today I took this photo in the garden of the Empress Hotel in Victoria. The same day on the ferry to Victoria I met David, on his way to work. Who would have thought, two years later we would be in Fairbanks celebrating Alaska Day!

Cranberry Applesauce

About a week ago I picked up a half dozen Jonagold apples from the grocery store. They looked good, but I am always wary of grocery store produce. I have been burned by peaches that actually smell like peaches in the grocery store, but once you get them home you realize they are just rubbery orbs that smell like peaches! I think everyone in Fairbanks has been burned by this phenomenon as I always see people cautiously putting produce into their carts. One day I couldn't help notice a guy out of the corner of my eye. He was watching as I sniffed the peaches, he picked one up and smelled it and then noticed I was watching him! Finally, he just asks "What am I supposed to be smelling?".  I told him it should smell like a peach! Anyway, these apples seemed as though they might actually be too shiny to be good. Finally, I decided to do something with them before they just rot and I would never know. I started with making mini apple pies (that post later), then realized I had way too many apples. Before adding the cornstarch to the pie recipe I dumped about 1/3 of the ingredients in a saucepan added about 1/4 cup cranberries and filled the pot just barely to the top of the apples with water and put it on the stove to simmer. I kind of forgot about it while I was making the pies.  When I came back to it I magically had applesauce. I decided I wanted some chunks, so I added a few more apples and cooked it for another 5 minutes. I had some for breakfast this morning and it was really good. So good, I went and bought some more Jonagold apples at Fred Meyer this afternoon. When I went in the store I did not hesitate and immediately picked out six more apples. I noticed another woman out of the corner of my eye confidently purchasing the same apples as I walked away. 

Thursday, October 16, 2008

White Chicken Chili


It felt a little strange pulling out the Ski House Cookbook in October, but we have had snow for weeks, so I figured it was acceptable. Not to mention David has already been skiing a few times. I hear the conditions are pretty good at Birch Hill. Anyway, I was running some errands on the far end of town yesterday and picked up a loaf of jalapeno cheddar cornbread from LuLu’s Bakery. I still have not got around to getting my own sourdough starter going, so we are still stuck with quick breads if I make bread at home. I wanted something to compliment the bread and thought a white chili would be perfect. I made a “quicker” version as the original calls for dried beans.

White Chicken Chili
adapted from The Ski House Cookbook
2 cans of Great Northern or Cannellini beans, rinsed
1 tablespoon extra virgin olive oil
4 cloves garlic, minced
1 large yellow onion, diced
1 can chopped green chilies
1 tablespoon ground cumin
½ teaspoon cayenne
½ teaspoon salt
¼ teaspoon freshly ground black pepper
¼ teaspoon red pepper flakes
4 cups chicken broth
1 lb. boneless, skinless chicken breast halves
1 tablespoon cornstarch
¼ cup heavy cream
optional: cheddar cheese, cilantro, fresh onions, tortilla chips for topping

Heat the oil in a large pot over medium heat. Add the garlic, onion, and chilies and cook until softened, about 5 minutes. Add the cumin, cayenne, salt, pepper, and red pepper flakes and cook for 1 minute more. Stir in the broth and bring to a boil. Lower the heat so the broth simmers and add the chicken. Cook until the chicken is cooked through, about 20 minutes. Remove the chicken from the pot and transfer to a cutting board. Add beans to the pot and let simmer. Remove ½ cup broth from pot and mix well with cornstarch. Add cornstarch mixture and cream to pot and mix well. Using two forks, shred the chicken, and then return it to the pot. Let simmer another 5 minutes and serve topped with cheese.

Wednesday, October 15, 2008

Potato Skillet Pie


First of all, it is a great time of year to be in Fairbanks. There is just enough snow for skiing and there is still a little daylight. This week the moon has been absolutely beautiful. Winter has definately set in. The temperature this morning at work was -5 degrees fahrenheit. Brrrr....
In many ways it really feels good to just sit and relax by the woodstove after dinner. The crazy days of summer are over. Preparing for winter can sometimes be harder than the actual winter. Now that we have our wood in the shed and the greenhouse and yard cleaned up, we can spend our evening reading and relaxing.
A few weeks ago our neighbors invited us over to get what was left of the potatoes in their garden. They "only" had two rows of reds left is what they told us, but we were welcome to take what was left. So we ended up with a wheelbarrow full of the most beautiful red potatoes I have ever seen. We estimate there to be somewhere between 70-90 pounds of potatos. Our dog weighs 70 lbs and there appears to be more potatoes than dog here.... So, I figure we will need to eat an average of 3lbs. of potatoes a week between now and June. Each week I am going to try and make one recipe that is primarily potatoes.
When I posted my "New Cookbook Challenge" Alison from Alison's Lunch wrote to say the Vegetarian Suppers from Deborah Madison's Kitchen was one of her favorite cookbooks. Last night I decided to make Potato Skillet Pie. There are many adaptations to this recipe in the cookbook and I would highly recommend them as this would have been pretty plain without some spicing up. I added cheddar cheese and topped the pie with Honey Chipotle Sauce. This recipe calls for Yukon Gold or other yellow potatoes, so I did not tap into my 90 lbs of red potatoes yet. I still had some beautiful yellow potatoes from the Farmer's Market. Also, this is recipe #8 in my new cookbook challenge. Stay tuned and help me choose my next cookbook purchase and maybe win one for yourself as well!
Potato Skillet Pie
from Vegetarian Suppers from Deborah Madison's Kitchen

4 tablespoons of butter or oil
1 cup breadcrumbs or 1/2 cup grated parmesean cheese (I used a little of both)
2 lbs of Yukon Gold, or Yellow Finn Potatoes peeled and cut into chunks
sea salt and freshly ground pepper
2 garlic cloves
4 eggs lightly beaten with a little water
3 tablespoons of chopped fresh sage

Preheat the oven to 375 degrees Fahrenheit. Put a 10 inch cast iron skillet ( I used a small glass baking dish as I do not own a cast iron skillet) in the oven with a tablespoon of butter until melted. Brush it around, then scatter bread crumbs or parmesan cheese to make a crust for the potatoes. Put the potatoes in a saucepan and cover with cold water. Add a teaspoon of salt, bring them to a boil, then simmer until the potatoes are soft, about 20 minutes. While they’re cooking, smash the garlic in a mortar with ½ teaspoon of salt until smooth. Drain the potatoes and return them to the pot. Add the garlic and remaining butter and mash. Taste for salt and pepper, making sure the potatoes are highly seasoned. Then stir in the eggs and sage, transfer the mass to the skillet, and smooth the top. Bake until golden and pulling away from the sides of the pan, about 45 minutes. Remove and let stand for 10 minutes, then run a knife around the edge and unmold onto a serving plate.

Tuesday, October 14, 2008

Baked Brownies

Wow! Get your glass of milk ready. These are some of the richest, most fudge like brownies I have ever eaten.

The Baked Brownie
from Baked New Frontiers in Baking
1 1/4 cups all-purpose flour
1 teaspoon salt2 tablespoons dark unsweetened cocoa powder
11 ounces dark chocolate (60 to 72% cacao), coarsely chopped
1 cup (2 sticks) unsalted butter, cut into 1-inch pieces
1 teaspoon instant espresso powder
1 1/2 cups granulated sugar
1/2 cup firmly packed light brown sugar
5 large eggs, at room temperature
2 teaspoons pure vanilla extract

Preheat the oven to 350 degrees F. Butter the sides and bottom of a 9 x 13 glass or light-colored metal baking pan.
In a medium bowl, whisk the flour, salt, and cocoa powder together.
Put the chocolate, butter, and instant espresso powder in a large bowl and set it over a saucepan of simmering water, stirring occasionally, until the chocolate and butter are completely melted and smooth. Turn off the heat, but keep the bowl over the water and add the sugars. Whisk until completely combined, then remove the bowl from the pan. The mixture should be room temperature.
Add 3 eggs to the chocolate mixture and whisk until combined. Add the remaining eggs and whisk until combined. Add the vanilla and stir until combined. Do not overbeat the batter at this stage or your brownies will be cakey.
Sprinkle the flour mixture over the chocolate mixture. Using a spatula (not a whisk), fold the flour mixture into the chocolate until just a bit of the flour mixture is visible.
Pour the batter into the prepared pan and smooth the top. Bake in the center of the oven for 30 minutes, rotating the pan halfway through the baking time, until a toothpick inserted into the center of the brownies comes out with a few moist crumbs sticking to it. Let the brownies cool completely, then cut them into squares and serve.
Tightly covered with plastic wrap, the brownies keep at room temperature for up to 3 days.

Sunday, October 12, 2008

Soy Sausage


I have no idea what took me so long to make these sausages. This recipe has been on my list to try for nearly two years. As with a lot of the recipes in the Cafe Flora Cookbook it is a bit time consuming, but worth it in the end. These were really good and dare I say tasted like real sausage.
Café Flora Vegan Soy Sausage
from Café Flora Cookbook
5 ounces (about 1 1/2 cups) TVP (unflavored textured vegetable protien)
1 1/4 cups very hot water
2 tablespoons Egg Replacer or other egg substitute equal to 2 eggs
1/2 cup cold water
1/2 block extra firm tofu pressed or extrafirm tofu
2 tablespoons chopped garlic
1 tablespoon fresh rosemary
1 1/2 teaspoons dried thyme
1 1/2 teaspoons dried sage
2 teaspoon fennel seeds toasted and coarsely ground
1 teaspoon red pepper flakes
2 teaspoons salt
1 teaspoon freshly ground black pepper
2 tablespoons corn starch
Vegetable oil for frying
Prepare the TVP. In a large bowl, cover the TVP with the hot water, stir once, and then cover the bowl with plastic wrap and let steam for 15 minutes. Remove the plastic wrap, put the TVP in a mesh strainer over a bowl to drain.
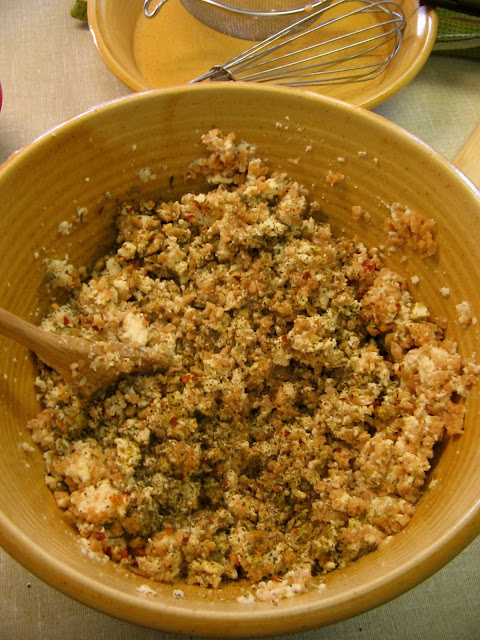
Make the sausage mixture. In a medium bowl, whisk the egg replacer with the cold water until it is slightly foamy like whipped egg white. Pat the tofu dry, and crumble into the egg replacer. Mix with your hands until thoroughly combined. Add the TVP along with all the remaining ingredients except oil, and mix well.Shape the patties. Using 3 tablespoons of the TVP mixture for each patty, shape it into balls. Gently flatten each ball with your fingertips into a patty about 2 1/2 inches in diameter. Smooth out the jagged edges so they don't break off when you cook them. Lay the patties on an ungreased cookie sheet until you are ready to fry them.Fry the sausage. Heat about 1/4 inch of oil in a nonstick skillet over medium-high heat. (If you don't have a nonstick pan, any heavy skillet works well.) When it's hot, put several patties in the pan, leaving enough room to flip them easily. Cook on each side until browned and heated through, about 2 minutes per side. Drain the patties on paper towels. Keep them warm in a 200 degree oven until ready to serve (no longer than half and hour).

Saturday, October 11, 2008

No Recipe Beef Noodle Soup

The first thing David noticed when he got home from work Friday night was that I wasn't using a recipe to cook dinner. There was no cookbook or magazine open, and no laptop sitting on the dining room table. We rarely eat beef at home, well at least when David is at home! Sometimes I treat myself to a steak when David goes out of town. In any case when it comes to beef it appears that the midwesterner comes out and instinct kicks in. This soup is a cross between soup and beef stroganoff.
Beef Noodle Soup
1 medium onion
2 cloves garlic
1 lb of tenderloin or stir fry beef
1 lb white mushrooms
4 cups beef broth
2 tbsp cornstarch
3 cups egg noodles
1 tsp thyme
1/4 cup cooking sherry
salt and pepper to taste
sour cream for topping
Thinly slice on medium onion and two cloves of garlic, add to a 4 quart dutch oven or soup pot and cook over medium heat until onions have become soft and translucent. Cut beef into bite sized pieces and add to the pot. Cut mushrooms into quarters and add to mixture, cook until beef becomes browned. Stir in thyme, salt, and fresh ground pepper. Add beef broth and bring to a simmer. Mix in cornstarch and add cooking sherry. Add egg noodles and simmer until noodles are tender. Serve with a generous dallop of sour cream to be stirred in before eating.

Thursday, October 9, 2008

Yam and Pepita Quesadilla

Sorry for the inconvenience, but this post has been updated with new photos.  You can find the updated version here.

Wednesday, October 8, 2008

Blueberry Almond Scones (the quest for the perfect scone part 2)


As I warned you last week, I am on a quest for the perfect scone. This is not it! I replaced the cherries with dried blueberries and cut them into triangles rather than circles. Other than that, not too many changes. These were not bad, just not what I was looking for in texture or flavor. David and everyone at work seemed to like them. I will keep trying. Here is the original recipe...
Cherry Almond Scones
from Macrina Bakery and Cafe Cookbook
1/2 cup dried cherries
1/2 cup whole almonds
3 cups unbleached all-purpose flour
1/2 cup granulated sugar
2 teaspoons baking powder
1 teaspoon baking soda
12 tablespoons (1 1/2 sticks) unsalted butter, chilled
1 egg
1/4 cup buttermilk
1 teaspoon pure vanilla extract
1/4 teaspoon pure almond extract
Egg wash made with 1 egg and 1 tsp water
1/4 cup coarse raw sugar
Preheat oven to 350 degrees.Place dried cherries in a small bowl and cover with warm water. Let soak for 10 minutes. Drain the plumped cherries, coarsely chop and set aside.Place almonds on a rimmed baking sheet and toast for appromimately 15 minutes or until golden brown. Let cool, then coarsely chop and set aside.Line a rimmed baking sheet with parchment paper.Sift flour, granulated sugar, baking powder, and baking soda into a medium bowl and toss with your hands to combine.Divide chilled butter into 1/4 inch pieces and drop into bowl of dry ingredients. Using a pastry cutter or fork, cut butter into mixture until texture is coarse and crumbly. Add the chopped cherries and almonds and mix with a wooden spoon. Combine egg, buttermilk, vanilla extract, and almond extract in a small bowl and mixt with a whisk. Add to dry ingredients and mix gently with a wooden spoon just until dough comes together. Take care not to overmix the dough. Coat your hands with flour and pull dough from bowl onto a floured surface. Knead the dough for a few minutes, folding and flattening it several times, until dough becomes moldable. Dust the work surface with a little more flour and roll dough out to 1 inch thick. Using a round biscuit cutter (about 3 inches), cut 8-10 scones from the dough. Place scones on the prepared baking sheet, bursh with egg wash, and sprinkle coarse raw sugar over the tops. Bake on center rack of oven for 20-25 minutes, or until golden brown. Let scones cool on baking sheet for 10 minutes before serving.
Related Posts with Thumbnails